(转)一个老外 对大画幅,中画幅胶片/IQ180, 135数码的对比
2252
13
|
[1 楼] 青梅红茶
[泡菜]
14-10-29 22:00
https://www.onlandscape.co.uk/2011/12/big-camera-comparison/#/
看到几篇帖子探讨8*10不如IQ180之类的评论, 我这里转贴一篇老外写得比较严谨的对比帖子。 This test originally came about as a response to a previous test on Luminous Landscape. Although the test below stands alone, you may wish to read the previous test and our response to it. If you do, please visit the luminous landscape page IQ180 vs 8×10 and the follow up posted in ‘On Landscape’ here. 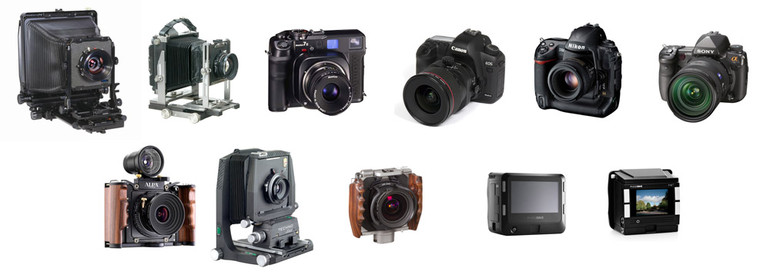 Joe Cornish, who owns a Phase One P45 but has spent much of his career shooting transparencies on 4×5 film Dav Thomas, who started shooting digital DSLR’s but moved onto film and eventually large format Chris Ireland, Phase One’s representative in the North East of England We also talked about the project on a few online forums, including the ‘Large Format Photography’ forum, the ‘Luminous Landscape’ forum. These were very helpful in picking the right approach. Following the test, we talked to other photographers who use large format film, high-end digital or both, including Hans Strand, Andrew Nadolski & David Ward We started looking at which cameras to test and distilled the potential candidates to the following Film Toyo 810MII Ebony 45SU Mamiya 7 Digital IQ180 on an Alpa IQ180 on a Cambo IQ180 on a Phase One 645DF Phase One P45 on a Linhof Techno Nikon D3X Canon 5Dmk2 We would have liked to have tested the IQ180 on the Linhof Techno as well but the platform used (any of them) didn’t contribute a great deal of difference to the sharpness of the result under ideal conditions so we don’t think this would have produced vastly different results. The Alpa and lenses were loaned to us by Paula of Linhof Studio the tilt shift lenses were loaned by Lenses for Hire and the D3X was contributed and operated by John Robinson. Our next job was to select a range of lenses that would give us a close enough focal length match. We made a presumption that most people interested in the results would probably be thinking about moving from 4×5 to digital and so we decided to settle on that as the aspect ratio for our conversions. Given this, the ratio of the short sides of the IQ180 (40.4mm) vs the short side of 10×8 (196mm) gives a ratio of 4.6:1 – these calculations were made for all of the cameras and as we wanted to use the Rodenstock Digaron W lenses, we only had 40mm, 50mm and 70mm lenses to choose from. Here is the conversion table we came up with.. Bear in mind that the table below uses the IQ180 as the baseline. Hence the multiplier is ‘how much do I need to multiply aperture or focal length to get the equivalent’. The %ge values next to each lens is a representation of how close it is to a perfect match for the IQ180 lens. This is mainly relevant for the landscape photograph shown later as we recomposed the picture by moving backwards and forwards to compensate for these changes (obviously we didn’t want the difference to be too much because of perspective effects). short side / mm multiplier f/stop equiv IQ180 40.4 1.0 5.6 40mm 50mm 70mm 8×10 196.0 4.9 27.2 210 8% 240 -1% 360 6% 4×5 96.0 2.4 13.3 90 -5% 110 -7% 180 8% 6×7 56.0 1.4 7.8 55 -1% 80 15% 80 -18% 35mm 24.0 0.6 3.3 24 1% 24 -19% 50 20% The table above also shows the f/stop equivalents. We estimated that the sharpest aperture for the IQ180 would be f/5.6 and so bracketed the photographs around this aperture. Obviously this needed converting to keep the same depth of field for each size of film/sensor and so the equivalent f/stop for 8×10 was f/22⅔ : 4×5 was f/11⅓ : 6×7 was f/8 and 35mm was f/4.. In reality, we realised that imperfect lens design would mean the optimum aperture may be larger than these and hence we bracketed with smaller apertures to make sure we found the sharpest point. Given the available focal lengths in 8×10 and 4×5 we decided to use the 40mm and 70mm Digaron W lenses which gave the following equivalent lenses. 8×10 For the 40mm equivalent we chose the Fujinon 240A, a very popular 4×5 lens which covers 8×10 with some room to spare. The resolution figures suggested it to be a fairly sharp performer. It was a bit longer that we would have liked but for the studio test we were able to move the camera back to compensate and ensure the same framing. For the 70mm equivalent we shopped around and finally Mr CAD loaned use a huge 360mm Schneider Symmar-S which we knew would perform exceptionally well and only had a 6% difference in focal length* giving a small advantage to the 8×10 for the landscape view. 4×5 For the 40mm equivalent we chose the Rodenstock 90mm f/4.5 Grandagon N, one of the best 90mm lenses available. For the 70mm equivalent we chose the Fujinon 180A, another classic large format lens and one that matches the 70mm fairly well although gives an 8% advantage to 4×5 over the IQ180* * i.e. If the cameras were shot from exactly the same position, the %ge difference would be a magnification ration. This translates directly into a %ge difference in resolving power. However, for the studio tests, we repositioned the cameras to compensate for this effect. 6×7 For the 40mm equivalent we chose the 55mm. The Mamiya 7 does not have a great range of lenses for quantity but for quality they are amongst the sharpest lenses ever made and this matched the focal length well. For the 70mm equivalent we again didn’t have a close match and the resulting shots have a disadvantage of nearly 20%. 35mm The 40mm equivalent on 35mm cameras was a handy 24mm and we decided to compare using tilt shift lenses on both the Nikon and Canon systems (the latest versions). The 70mm equivalent wasn’t really a great match again, giving a 20% advantage to 35mm. Test Targets Here is a sample picture of the test target used.  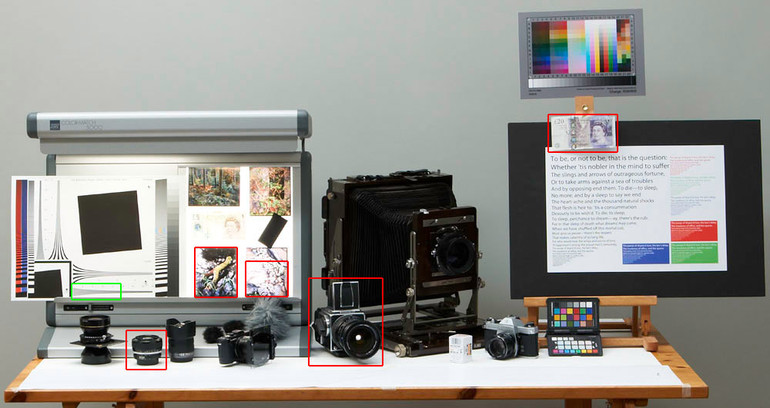 We were very keen on having some real world targets for the resolution testing but after some debate we also decided to include proper resolution targets and in retrospect it was a wise decision. The tests used were the slanted edge target supplied by Imatest (printed on matt paper using an Epson 4800). The slanted edge target also includes a ‘resolution trumpet’ (I’m sure there is a proper name for this) which is a set of lines which gradually get finer and closer together. We calculated the resolution of these lines so that even in the very best scenario of 8000dpi 8×10 being pin sharp we would still have resolution to spare. We also included a few slanted edge lines in different colours to take a look at possible bayer array issues. The test on the right was for a ‘readability’ test. This is to combat the potential for raw converters or sharpening to add data that wasn’t in the original image. Again these were included in the three primary colours. Two colour targets were included as well, one a colorchecker and the other a Wolf Faust IT8 target. The light box used for the main resolution tests is a Just Normlicht Colormatch 5000 which has a colour balanced proofing light and lightbox. The lightbox is used to display four transparencies that include typical landscape scenes. We have also included a five pound note and a twenty pound note which provide very fine detail to check rendering. Finally, we raided Joe Cornish’s camera cupboard and laid out a few lenses and cameras. The results show extracts from the Hassleblad, Nikkor Lens, Transparencies and the twenty pound note. The exposures were made based on the different films used. For instance for the digital cameras we exposed using the histogram and checked this with the light meter. For transparency film we spot metered the paper white and set this at +1⅔; the negative exposure was made by setting the darkest shadow at -2 (we chose the darkest part of the 8×10 camera bellows) and the black and white was set with the paper whites on the lightbox at +3 stops. The photographs were taken over the space of a three hours and the ambient light in the room changed by about a stop over this period. Obviously the illumination of the lightbox remained constant throughout. ENSURING STABILITY AND SHARPNESS Making sure that the cameras produce the sharpest results possible is an art in of itself. Instead of going through all of the steps taken, here is a summary Using a five series Gitzo tripod with a BH55 ball head with spikes Ensuring no one moving when exposures were taken and give time for system to settle (no main roads nearby etc) Use two tripods for the 8×10 shot (a Velbon Sharpa/Carmagne CF tripod and a five series Gitzo tripod) the smaller tripod supporting the lens end of the camera. Use double sided tape for the dark slides for 4×5 and 8×10 (more about that later) Final focus with an 8x Schneider loupe for 4×5 and 8×10 Use live view for digital focussing For the main aperture chosen, take multiple shots (this includes film e.g. 3 sheets of Provia for both 8×10 and 4×5) For outdoor shots, ensure that tripod legs are firmly bedded into subsurface of soil Protect camera from wind (using bodies for larger cameras) The studio IQ180 photographs were taken using three different camera systems, an Alpa SWA, a Cambo Wide RS and a Phase One 645DF. Although we used the 40mm Rodenstock Digaron W on the Alpa, the lens used on the Cambo was a Schneider 35mm f/5.6 APO Digitar XL and the lens used on the Phase One 645 was the Phase One 45mm Digital AF f/2.8. Remember that the position of all cameras was changed to ensure the same view on the sensor/film. The film was developed at Peak Imaging, Sheffield (Xtol was used for the black and white processing) and the 8×10 black and whites were developed by Palm Labs, Birmingham. The film was checked using an 80x stereo microscope and photographs were taken through the microscope to record absolute resolution on film. 4000dpi scans were then made using a Howtek 4500 drum scanner with higher resolution scans made by Matt Kaye of Karmaan on an ICG and Lanovia. It should be noted that the scans were made at an aperture of 6 micron which gets the sharpest pictures but does mean grainy results, scanning with an aperture of 13 micron reduces the noise considerably at a very slight loss of resolution. The following image shows the resolution target results that have been aligned to keep the resolution axis label consistent. Some of the resolution axes were so long that we had to composite the final microscope images from multiple photographs (e.g. the 8×10 black and white result). Digital images were uprezed using Capture One – we tried alternative methods but the results did not change the underlying resolution results. Some of the details are too fine to see on this version – click here for a 1600px wide version. It is worth noting that we have based our results on the highest resolution camera in our test, in this case it was the 8×10, and enlarged the other results to compare. We should also mention the sharpest aperture chosen for each platform. The sharpest aperture on the IQ180 was generally f/4 although more contrasty is a better description (see later). The sharpest aperture on 5×4 was f/16⅔ and on 8×10 was also f/16⅔ – this shouldn’t completely surprise us as the most large format lenses perform best at the centre of their image circle at between f/16 and f/22. We also shot images at smaller apertures and the reduction in resolution was quite interesting and is reproduced in a separate table below the results here. The 35mm sharpest aperture was f/5.6 but like the medium format, very little extra information was recorded, the contrast was just higher. You may ask why we are using a microscope to look at the film (and possibly how did we get pictures?). Well many people say that you can get sharper images by enlarging film and the only way to find out the true capability of the film without enlarging is to check through a microscope, the following image shows our 80x stereo microscope. The images were taken using a Canon 5Dmk2 but even this was not able to show the very finest of lines visible through the microscope. e.g. the Mamiya 7 T-Max result shows 7 as the highest value when photographed through the microscope but we can clearly see a value of 9 by eye (the microscope has a higher magnification when used by eye). This suggests that it may be possible for the Mamiya 7 to resolve as much as 4×5 with a very good enlarger. This remains to be tested. 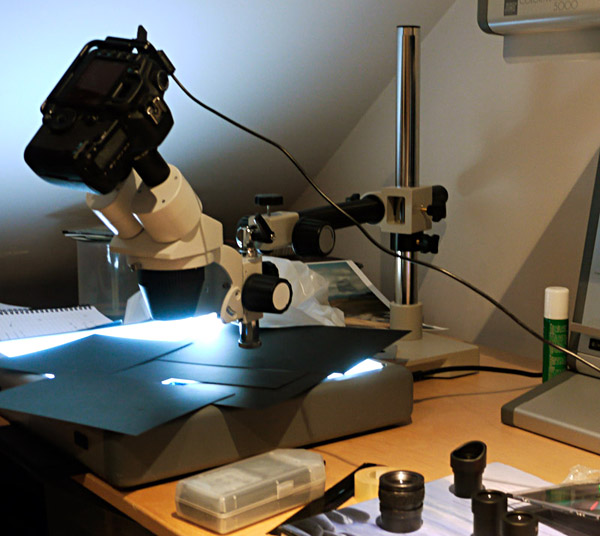 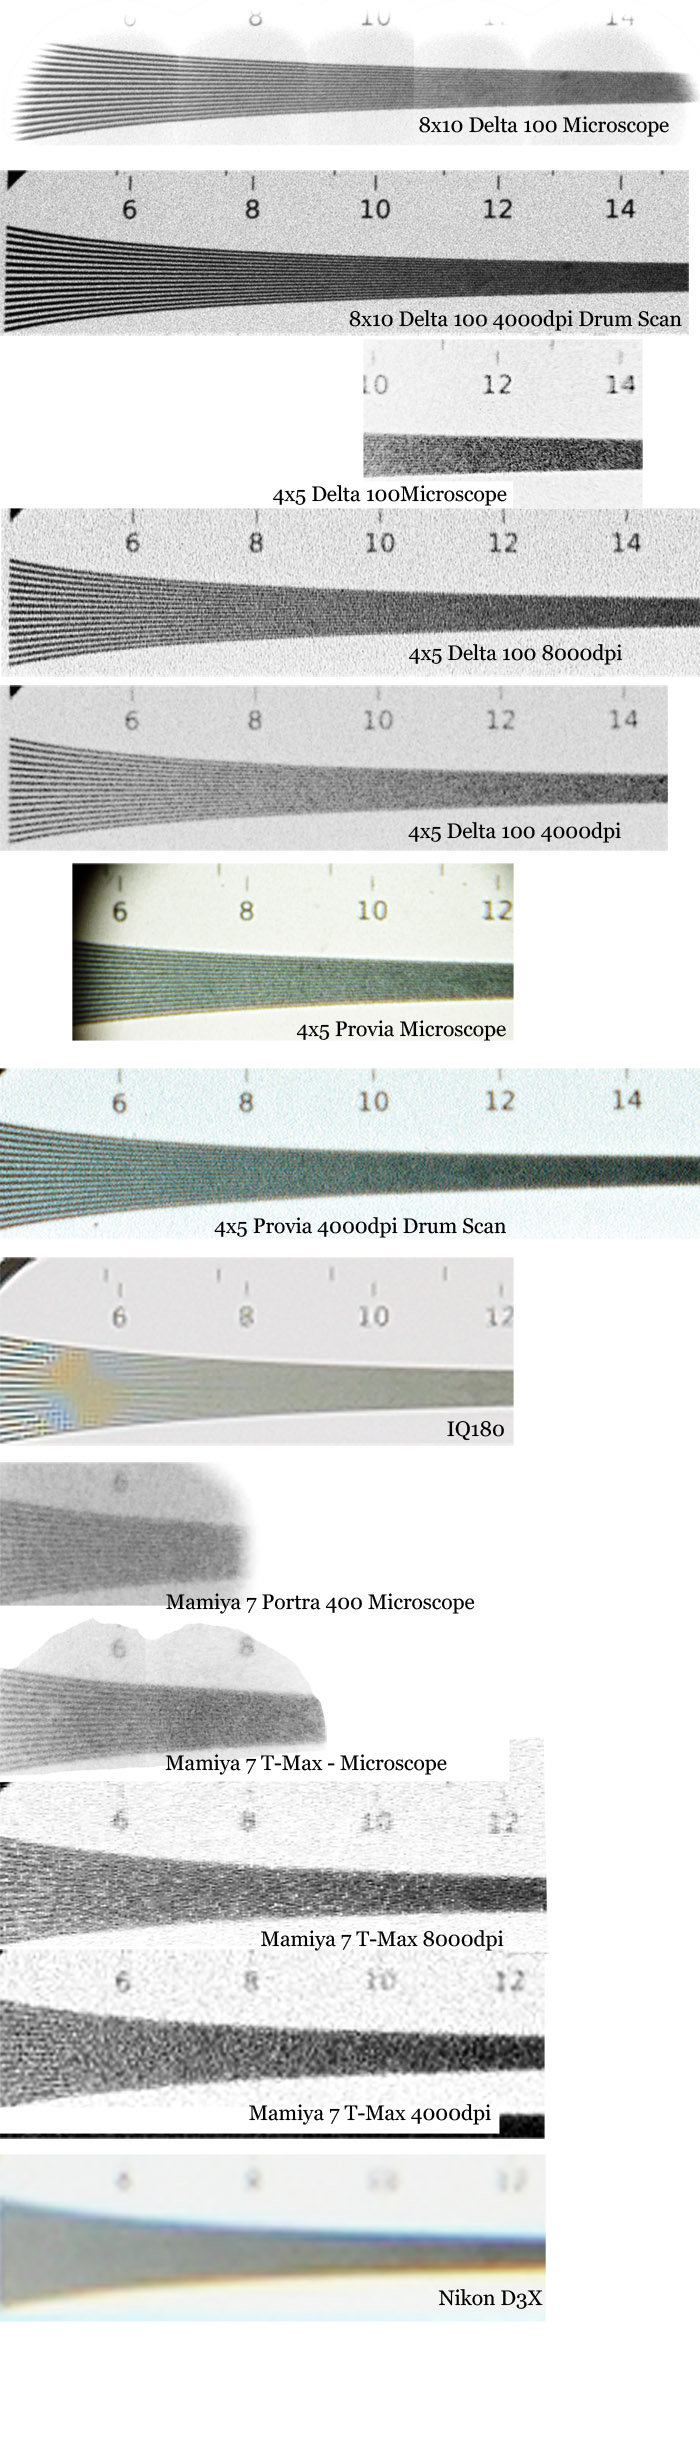 max resolved height in pixels Mp print size (inch) where dpi=300 8×10 Delta 100 (microscope) 14 22400 627Mp 75″ 93″ 8×10 Delta 100 (4000dpi) 14 22400 627Mp 75″ 93″ 4×5 Delta 100 (microscope) 12 19200 461Mp 64″ 80″ 4×5 Delta 100 (8000dpi) 11 17600 387Mp 59″ 73″ 4×5 Delta 100 (4000dpi) 10 16000 320Mp 53″ 67″ 4×5 Provia 100 (microscope) 11 17600 387Mp 59″ 73″ 4×5 Provia 100 (4000dpi) 8 12800 205Mp 43″ 53″ IQ180 5 7760 80Mp 26″ 32″ Mamiya 7 Portra (microscope) 6 9600 115Mp 32″ 43″ Mamiya 7 T-Max (microscope) 7 11200 157Mp 37″ 47″ Mamiya 7 T-Max (8000dpi) 5 8000 80Mp 27″ 33″ Mamiya 7 T-Max (4000dpi) 4 6400 51Mp 21″ 27″ Nikon D3X 2.4 4000 24Mp 13″ 20″ Canon 5D2 2 3700 21Mp 12″ 19″ These figures should not be taken as bare facts of perceivable differences as different cameras have more or less grain for instance and even though the target resolution was visible, they may have been at less contrast. This does indicate our evaluation of resolving power of these systems though. Items in grey italics are the theoretical results based on microscope analysis. Also it should be mentioned that these figures work out slightly higher than mathematically calculated resolving powers due to diffraction – however these assume a certain level of contrast and we are looking at the ‘extinction’ value where the detail actually disappears. This has given us an extra 10-15% of resolution compared with theoretical values of maximum enlargement. Below are the examples showing reduction in resolution at smaller apertures – italics here are used to show the smaller aperture results. I haven’t included the results from the IQ180 at different apertures as the camera was sensor limited and resolved the same amount of lines for f/4 f/5.6 f/8 and f/11 – the only difference was that the f/4 and f/5.6 were contrastier and showed more moire. The f/11 result was lower contrast but showed no moire – I’ve included a photo of the details here which have been scaled up using ‘preserve edges’ to show actual pixel detail. There was some concern about whether the IQ180 results were in focus; we used live view to focus check but the 1s refresh didn’t allow us to do the normal ‘sweep’ through the focus range to pick the sharpest point. However, it did let us confirm that moving the focus back and forth did not change focus at all and hence we were fairly sure we were at peak focus. We also checked what the depth of field was using the 5 micron pixel size and calculated a value of 20cm front to back. This gave enough room to focus on the chart and still get the cameras within the focus spread. It also confirmed that the camera is sensor limited. i.e. the lens is outresolving the camera, 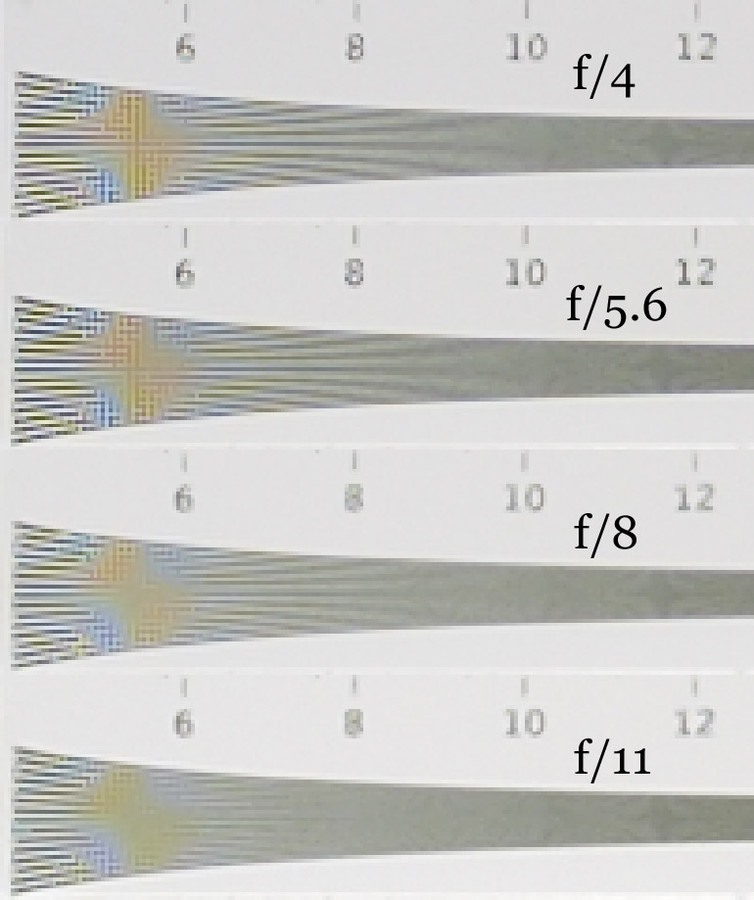 4×5 Provia 100 f/16⅔ (4000dpi) 8 12800 205Mp 43″ 53″ 4×5 Provia 100 f/22⅔ 7 11200 157Mp 37″ 47″ 4×5 Provia 100 f/32⅔ 6 9600 115Mp 32″ 43″ 4×5 Provia 100 f/45⅔ (extrapolated) 4.3 6912 60Mp 23″ 28″ 8×10 Delta 100 f/16⅔ (4000dpi) 14 22400 627Mp 75″ 93″ 8×10 Delta 100 f/22⅔ 12 19200 461Mp 64″ 80″ 8×10 Delta 100 f/32⅔ 9 14400 259Mp 48″ 60″ 8×10 Delta 100 f/45⅔ (extrapolated) 6.5 10400 134Mp 34″ 43″ 8×10 Delta 100 f/64⅔ (extrapolated) 4.7 7500 70Mp 25″ 31″ The results for the Mamiya 7 when observed through the microscope directly gave higher figures than the photos through the microscope. At f/5.6=8, f/8=9, f/11=7, f/16=6 – obviously these results will probably all resolve down to 4 or 5 when drum scanned on a 4000dpi scanner. This does suggest that darkroom prints may be able to made to a scale similar to 4×5 if very high end equipment and techniques are used. We also have comparison samples from some of the areas of the test target. STUDIO NIKON LENS You can download the psd file by clicking here.   Comparing 8×10 Provia with IQ180 Alpa 1s Comparing 8×10 Provia with IQ180 Alpa 1sThe right hand side is the IQ180 on the Alpa – by default the left hand side is the 8×10 Provia but you can change this by clicking on the links below (noise reduction has been applied using Imagenomic Noiseware to the second set) 8×10 Provia 4×5 Provia 8×10 Provia (noiseware) 4×5 Provia (noiseware) 8×10 Provia (noiseware/photokit) 4×5 Provia (noiseware/photokit) Now the IQ180 result doesn’t look particularly great here but this has been enlarged considerably to bring it up to the same size as the 8×10 4000dpi scan. You can see in the image below a 100% view of the area including the Nikon lens and if you click on it you can see the whole of the target area at 100%. You can download a sample of the 8×10 black and white file although be aware that it is a 26Mb zip file. 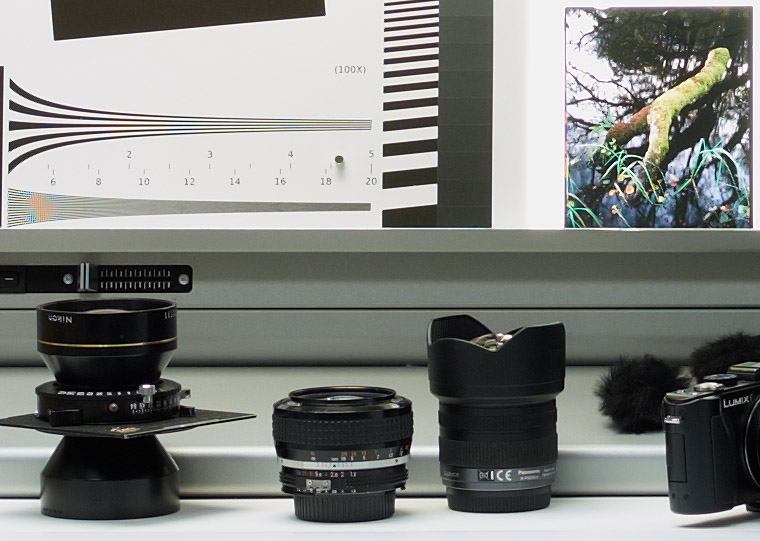 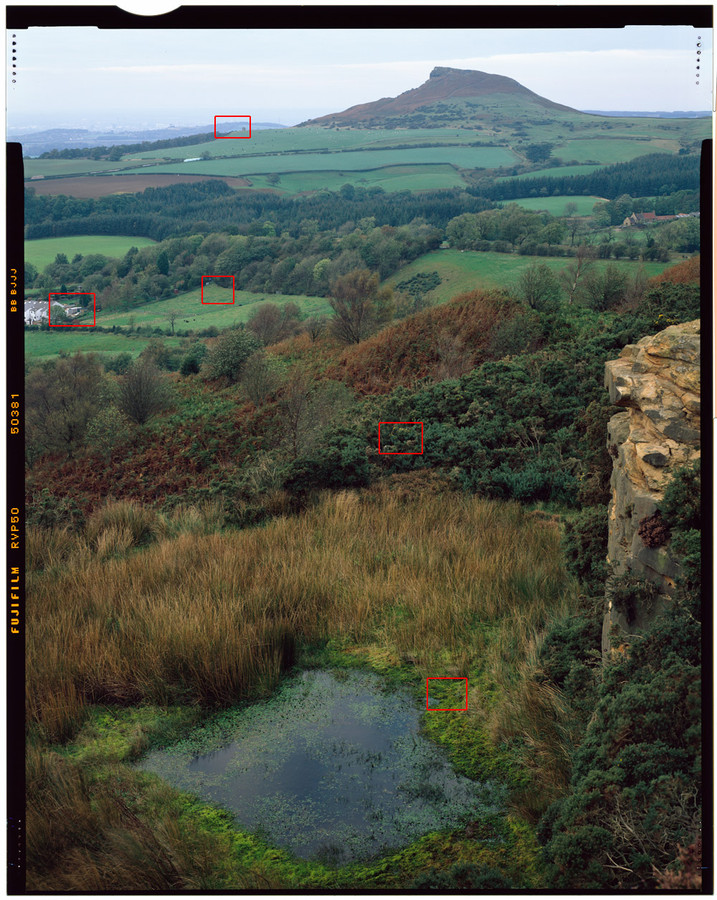 The idea of this test is more about comparing the way the results are rendered, the tonality and colour. The resolution of the IQ180, 4×5 and 8×10 are close enough in focal lengths that comparing them as ‘equivalent’ is fine for all but absolute resolution purposes. The image was taken under quite windy conditions, probably about 20-30 mph with the occasional stronger gust. We used a firmly grounded tripod and a second tripod on the 8×10 supporting the front element. We tried to protect the cameras from the wind with our body (bodies for the 8×10) but it was coming toward the front of the camera so was difficult to stop easily. We have done basic colour and contrast adjustments to match the images where possible (using the Portra as a baseline) but we made sure that we only use a simple central colour picker for the colour balancing and a simple photoshop curve (two control points) for the contrast. We thought that this would be better than comparing images with vastly different colour balances. It should be noted in all of these tests that whilst some of the cameras look particularly bad (i.e. the Mamiya 7, P45 and DSLR’s) this is only because they are being enlarged a great deal more than you would ever do in a real world situation. These shots on screen represent looking at a 12m by 8m print (assuming screen resolution of 100dpi) or a 6m by 4m print in the cases where the tests are marked by “50%”. All of the extra tests are currently available on the following pages. Please note the following Sharpening was done with a combination of Smart Sharpen (which uses a deconvolution sharpening depending on size of radius) or Photokit Sharpener. Noise reduction was done with Imagenomic’s Noiseware plugin. Additional noise was added to one of the IQ180 scans (noted in the tests) using Photoshop’s ‘add noise’. http://static.timparkin.co.uk/static/tmp/cameratest-2/800px.html http://static.timparkin.co.uk/static/tmp/cameratest-2/large.html We recorded some video but didn’t really do a good enough job to make it into anything exciting but thought it may add some background. We solicited a few opinions on the results from various photographers who use different platforms discussed which you can read here. I have also written my thoughts on the results combined with a few more calculations and conclusions here. This article was featured in our bumper christmas issue which you can access here. Here is the 1Mbps version (click here for iPhone/iPad version) Error loading player: No playable sources found Or if you are on a slow iPhone/iPad connection you can try a lower bandwidth version by clicking here |
|
[14 楼] 平淡如真
[泡菜]
15-5-22 20:30
好
本帖由 iPhone7,2 客户端发布 |
|
[13 楼] RX9X
[禁言中]
15-5-22 10:23
 |
|
[12 楼] 青梅红茶
[泡菜]
14-11-4 21:51
不息 发表于 2014-10-30 20:19 用谷歌翻译了!》? 哈哈! |
|
[11 楼] pooruhc
[资深泡菜]
14-10-31 12:55
晓巴 发表于 2014-10-30 20:08 别急着否定.别人测的是不同相机系统的分辨率.是不同机器和镜头间的对比.所以.别人列出了等效焦距及实际使用镜头焦距,还有换算率.另外,显微镜观看距离改变不影响分别率,那只是成像距离的不同, 最终分辨率还是取决于底片. 这英国人做的还是挺专业的,至少做的很用心.这就是一个不同相机之间比较. 看来画幅确实决定了一切.135就算全画幅,就算像素再高也没用. |
|
[10 楼] 不息
[资深泡菜]
14-10-30 20:19
https://www.onlandscape.co.uk/2011/12/big-camera-comparison/ /
看到几篇帖子探讨8 * 10不如IQ180之类的评论,我这里转贴一篇老外写得比较严谨的对比帖子。 这个测试最初是作为应对前一个测试在明亮的风景。虽然下面的测试站,您可能希望读前面的测试和我们的反应。如果你这样做,请访问发光景观页面IQ180 vs 8×10和跟进发布“景观”。 我们接下来研究的第一篇文章通过与几个不同的摄影师在人为了得到他们的输入彻底测试会是什么样子,这些后来帮助与实际运行的测试(如此大规模的感谢他们!)。 乔•科尼什谁拥有一个阶段一个下岗通知但花了他职业生涯的大部分射击幻灯片4×5电影 Dav托马斯,开始拍摄数码单反的但最终转移到电影和大型格式 克里斯•爱尔兰第一阶段在英格兰东北部的代表 我们也谈到了这个项目在一些网上论坛,包括大画幅摄影论坛,论坛“发光的景观”。这些都是非常有用的在挑选正确的方法。 测试后,我们与其他摄影师使用大画幅胶片,高端数字或两者,包括汉斯链,安德鲁Nadolski &大卫病房 我们开始观察哪些相机测试和蒸馏下面的潜在候选人 电影 日本东洋810年信息产业部 乌木45苏 玛米亚7 数字 IQ180在阿尔芭。 IQ180在柬埔寨人 在第一阶段645 df IQ180 第一阶段下岗通知Linhof电子 尼康D3X 佳能5 dmk2 我们希望测试的IQ180 Linhof电子,但使用的平台(任何)没有贡献很大差别的清晰度结果在理想条件下,所以我们不认为这将会产生截然不同的结果。阿尔芭和眼镜借给我们的宝拉Linhof工作室雇佣的倾斜转变眼镜借给了眼镜和D3X的贡献,由约翰·罗宾逊。 我们接下来的工作是选择一系列的镜头,会给我们一个足够近焦距匹配。我们做了一个假设,大多数人感兴趣的结果可能会考虑从4×5数字,所以我们决定定居,随着宽高比为我们的转换。有鉴于此,短的比例的IQ180(40.4毫米)和短的一面10×8(196毫米)为4.6:1的比例,这些计算结果都是为所有的相机和罗德斯多克我们想使用Digaron W镜头,我们只有40毫米,50毫米和70毫米镜头可供选择。这里是我们想出的换算表。 记住下面的表格使用IQ180作为基线。因此,乘数是多少我需要增加光圈和焦距得到等效的。%通用电气值旁边的每个镜头都是一个表示距离IQ180镜头一个完美的匹配。这主要是相关的景观照片后我们再重新构图的画面显示前后移动来弥补这些变化(显然我们不希望太多的区别,因为角度的影响)。 短边/ mm f /停止相等的乘数 IQ180 40.4 1.0 5.6 40毫米50毫米70毫米 8×10 196.0 4.9 27.2 210 240 240 -1% 8% 8% 4×5 96.0 2.4 13.3 90 110 110 -7% -5% -5% 6×7 55 -1% 80 15% 80 56.0 1.4 7.8 -18% 35毫米24.0 0.6 3.3 24 1% 24 -19% 50 20% 上面的表中还显示了f /停止等价物。我们估计的最大孔径IQ180将f / 5.6,所以将这个孔周围的照片。显然这需要将保持相同的景深对于每个电影/传感器的大小,所以8×10的等效f /停止f / 22:4×5 f / 11:6×7 f / 8,35毫米f / 4 . .在现实中,我们意识到,不完美的透镜设计意味着最优孔径可能比这些,因此我们将较小的光圈,以确保我们发现最大点。 鉴于8×10可用的焦距和4×5我们决定使用40毫米和70���米Digaron W镜头下面的等价的镜头。 8×10 为40毫米相当于我们选择了Fujinon 240 a,一个非常受欢迎的4×5镜头涵盖8×10与有空余的房间。解决数据表明,它是一个相当锋利的表演者。一段时间,我们就会喜欢但是工作室测试我们能够移动相机回到补偿,确保相同的框架。 70毫米相当于我们购物,最后CAD借给先生使用一个巨大的360毫米施耐德Symmar-S我们知道会表现得非常好,只有6%的差别焦距*给一个小优势景观的8×10的观点。 4×5 罗德斯多克为40毫米相当于我们选择了90 mm f / 4.5 Grandagon N,最好的90毫米镜头可用。 70毫米相当于我们选择Fujinon 180一个,另一个经典的大画幅镜头和相匹配的70毫米相当不错虽���给出了8%的优势在IQ180 4×5 * *即如果相机拍摄在完全相同的位置,%通用电气的区别会放大配给。这将直接转化为一个% ge分辨能力的差异。然而,对于工作室的测试中,我们重新定位相机来弥补这种效果。 6×7 为40毫米相当于我们选择了55毫米。玛米亚7没有一个伟大的镜头范围但质量数量是有史以来最大的镜头,这与焦距。 70毫米相当于我们又没有接近的比赛和随之而来的镜头有一个劣势近20%。 35毫米 35毫米相机的40毫米当量是一个方便的24毫米,我们决定使用倾斜转变比较上镜头尼康和佳能系统(最新版本)。 70毫米等效并不是真的又一个伟大的比赛,给35毫米20%的优势。 测试的目标 这是一个示例图片使用的测试目标。 的地区,我们将显示在我们的测试中被标记为红色。中使用的示例是绝对解决测试用绿色标记 我们非常渴望有一些真实世界的目标分辨率测试但经过一些讨论我们也决定包括妥善解决目标和回想起来这是一个明智的决定。提供的测试使用斜边缘目标份额(马特印在纸使用爱普生4800)。斜边缘的目标还包括一个“决议小号”(我肯定有一个合适的名字)这是一组线条逐渐得到更好和更紧密地联系在一起。我们计算这些线的分辨率,这样即使在最好的情况下销8000 dpi 8×10的锋利的我们仍然有决议。我们还包括几行斜边缘在不同颜色看看可能的拜耳阵列问题。 右边的测试是一个“可读性”测试。这是打击潜在的生转换器或磨添加不在原始图像的数据。这些都是包含在三个主要的颜色。两个颜色的目标也包括,一个colorchecker,另一只狼浮士德IT8目标。主要解决测试使用的灯箱是只是Normlicht Colormatch 5000,它有一个色彩平衡的防光和lightbox。lightbox是用于显示四个幻灯片,包括典型的景观场景。 我们还包括5英镑的钞票和一百二十英镑注意提供非常细节的检查呈现。最后,我们搜查了乔·康沃尔的摄像头橱柜和一些镜头和相机。结果显示从Hassleblad提取物,尼克尔镜头,幻灯片和20英镑的注意。 基于不同的电影进行了曝光。例如我们暴露的数码相机使用直方图和检查这个测光表。透明胶片我们现场计量纸白和设置这个+ 1;消极的接触最黑暗的阴影是由设置在2(我们选择最黑暗的8×10的一部分相机波纹管)和纸白人的黑人和白人是在+ 3的lightbox上停止。 照片拍摄在三个小时的空间和房间里的环境光变化停止在此期间。明显的照明lightbox在仍然保持不变。 确保稳定和清晰度 确保相机产生最严重的结果可能是一种艺术的本身。而经历的所有步骤,这是一个总结 使用五大系列Gitzo三脚架与峰值BH55球头 确保没有人移动时曝光时间拍摄,给系统解决(没有附近的主要道路等) 使用两个三脚的8×10枪(Velbon Sharpa / Carmagne CF三脚架和5系列Gitzo三脚架)较小的三脚架支撑相机的镜头结束。 使用双面胶带暗幻灯片4×5和8×10(稍后详细说明) 最后重点以8 x施耐德4×5和8×10的放大镜 使用数字聚焦 主要选择光圈,把多个镜头(这包括电影。3张Provia 8×10和4×5) 户外拍摄,确保三脚架的腿坚决层状到地下的土壤 保护相机从风��(使用身体较大的相机) 工作室IQ180照片是使用三个不同的相机系统,阿尔芭SWA、柬埔寨人宽RS和第一阶段645 df。罗德斯多克虽然我们使用40毫米Digaron W阿尔芭,镜头用在柬埔寨人是施耐德35 mm f / 5.6 diginotar XL朊和镜头用在第一阶段645年第一阶段45 mm f / 2.8数字房颤。记住所有摄像机的位置被改变以确保传感器/电影相同的观点。 这部电影是在高峰成像,谢菲尔德(Xtol用于黑白处理)和8×10黑人和白人是由棕榈实验室,伯明翰。这部电影是使用80 x立体显微镜检查和照片通过显微镜拍摄记录绝对关于电影的决议。4000 dpi扫描然后用Howtek 4500鼓具有较高分辨率的扫描仪扫描由马特·凯耶Karmaan ICG和Lanovia。应该注意的是,6微米的孔径进行了扫描,得到了最大的照片但意味着模糊的结果,扫描的孔径13微米降低了噪音大大非常轻微的决议。下面的图片显示了解决目标一致的结果保持一致决议轴标签。有些解决轴这么长时间,我们必须综合最后显微镜图片来自多个照片(如8×10的黑白的结果)。数字图像是uprezed使用捕获一个替代方法——我��尝试,但结果并没有改变底层的解析结果。一些细节太好看到这个版本,请点击这里查看1600 px宽版本。 值得注意的是,我们有我们的结果基于最高分辨率的相机在我们的测试中,在这种情况下是8×10,并扩大其他结果比较。 我们还应该提到最大孔径选择为每个平台。IQ180普遍的最大光圈f / 4尽管更多的明暗差别强烈的是一个更好的描述(见后)。5×4的最大光圈f / 16和8×10也是f / 16 -这完全不惊讶我们最中心的大画幅镜头表现最好的自己的形象圈在f / 16和f / 22之间。我们还在较小的光圈拍摄图像和降低分辨率相当有趣,下面复制在一个单独的表中结果。35 mm最大光圈f / 5.6,但像媒体格式,很少的额外的信息被记录,对比就更高。 你可能会问为什么我们要使用显微镜看电影(甚至我们怎么照片?)。好多人说你可以获得更清晰的图像通过扩大电影和发现的唯一途径没有扩大的这部电影的真正功能是通过显微镜检查,下面的图片显示了我们的80 x立体显微镜。图像被使用佳能5 dmk2但即使这是无法显示的最好行通过显微镜下可见。如玛米亚7 T-Max结果显示7作为最高价值时通过显微镜拍摄的,但是我们可以清楚地看到一个值的9眼(显微镜更高放大时使用的眼睛)。这表明,有可能为玛米亚7解决多达4×5放大机非常好。这还有待验证。 我们使用这些图片,找出最优扫描大小是通过假设您至少需要每行一个像素来表���测试图表。例如,100年8×10三角洲结果如图14显示了最大(即你可以看到在14号线分离的图表)。在这个职位在图表中,我们可以找出框架的高度比例由群表示15行0.134%因此如果我们需要30像素代表15行,我们应该30/0.00134大约22400像素的帧高度。我们可以计算出框架宽度除以8乘以10 = 28000像素,因此我们可以算出有多少像素代表= 28000 x 22400 = 28000像素。我们也可以计算出多大的印刷这是22400像素的高度除以一个300 dpi打印分辨率使得75”宽,93“高打印。 马克斯解决高像素像素打印尺寸(英寸),dpi = 300 8×10三角洲100(显微镜)14 22400 22400议员627“93” 8×10三角洲100(4000 dpi)14 4000 4000议员22400“93” 4×5三角洲100(显微镜)12 19200 19200议员461“80” 4×5三角洲100(8000 dpi)11 8000 17600 mp 59“73” 4×5三角洲100(4000 dpi)10 4000 4000 mp 53“67” 4×5 Provia 100(显微镜)11 17600 387 mp 59“73” 4×5 Provia 100(4000 dpi)8 4000 12800 43议员“53” IQ180 5 7760 80议员26日“32” 玛米亚7 Portra(显微镜)6 9600 115 mp 32“43” 玛米亚7 T-Max(显微镜)7 11200 157 mp 37“47” 玛米亚7 T-Max(8000 dpi)8000 8000议员27日“33” 玛米亚7 T-Max(4000 dpi)4 4000 51议员21“27” 尼康D3X 2.4 - 4000 24议员13“20” 佳能5 d2 2 3700 21议员12“19” 这些数据不应该被视为事实背后的可��知的差异,不同的相机有或多或少的谷物例如尽管目标分辨率是可见的,他们可能是在低对比度。这表明我们的评估这些系统的分辨能力。物品在灰色斜体基于显微镜分析的理论结果。还值得注意的是,这些数据计算出略高于数学计算解决权力由于衍射——然而这些假设某种程度的对比,我们看着“灭绝”价值,细节真的消失了。这给了我们一个额外的10 - 15%的决议与理论最大的值增大。 下面的示例显示分辨率较小的光圈,减少斜体下面是用来显示小孔径的结果。我还没有包括IQ180的结果在不同孔径的相机传感器有限,解决了相同数量的行f / 4 f / 5.6 f / 8和f / 11 -唯一的区别是,f / 4和f / 5.6明暗差别强烈的,显示更多的波纹。f / 11的结果是低对比但没有波纹——我在这里包括细节的照片已扩大使用“保存边缘”节目实际像素细节。有些担忧焦点IQ180结果与否,我们生活中使用视图集中检查但1 s刷新不允许我们做正常的“扫描”通过聚焦范围最大点。然而,它确实让我们确认来回移动焦点并没有改变焦点,因此我们很自信我们在峰值的焦点。我们还检查什么是景深使用5微米像素大小���计算值为20厘米面前。这给了足够的空间关注焦点中的图表和仍然得到相机蔓延。它还证实,相机传感器是有限的。即outresolving相机镜头, 马克斯解决高像素像素打印尺寸(英寸),dpi = 300 4×5 Provia 100 f / 16(4000 dpi)8 4000 205 mp 43“53” 4×5 Provia 100 f / 22 7 11200 157 mp 37“47” 4×5 Provia 100 f / 32 6 9600 115 mp 32“43” 4×5 Provia 100 f / 45(外推)4.3 6912 60议员23“28” 8×10三角洲100 f / 16(4000 dpi)14 4000 627像素75年“93” 8×10三角洲100 f / 22 19200 19200 461 mp“80” 8×10三角洲100 f / 32 9 14400 14400 mp 48“60” 8×10三角洲100 f / 45(外推)6.5 10400 10400 mp 34“43” 8×10三角洲100 f / 64(外推)4.7 7500 70议员25“31” 玛米亚7的结果当通过显微镜观察时直接给数据高于通过显微镜照片。在f / 5.6 = 8,f / 8 = 9,f / 11 = 7,f / 16 = 6 -显然这些结果可能会解决到4或5当鼓4000 dpi扫描仪扫描。这确实表明暗室可以冲印规模类似于4×5如果非常高端设备和技术。 我们也有比较样本的一些地区的测试目标。 工作室尼康镜头 你可以点击这里下载psd文件。 比较8×10 Provia IQ180阿尔芭 右边是IQ180阿尔芭——默认情况下,左手边是8×10 Provia但是你可以改变这种通过点击下面的链接(降噪应用使用Imagenomic Noiseware第二集) 8×10 Provia 4×5 Provia 8×10 Provia(noiseware) 4×5 Provia(noiseware) 8×10 Provia(noiseware / photokit) 4×5 Provia(noiseware / photokit) 现在IQ180结果看上去并不特别大但这已大大扩大,使其处于相同的大小8×10 4000 dpi扫描。在下图中可以看到100%的地区包括尼康镜头,如果你点击它你可以看到整个目标区域的100%。您可以下载一个示例8×10的黑白文件虽然意识到这是一个26 mb的zip文件。 工作室测试是我们工作的主要结果,但我们不能在这里完成。我们需要采取一些实际的照片在现实条件。总是被提出,尽管理论上可以得到高分辨率的结果4×5和10×8,有很多妥协在现实世界中使用意味着不太可能基于工作室可以重复结果。附近我们工作室工作是一个方便的砂岩边缘与一个伟大的地平线。视图从Kildale看着木莓超过城市Middlesborough的背景。下面的图片显示了4×5 Velvia照片不用研究生(显示更多动态范围比许多人将信贷Velvia——天空阅读关于13 ev和前台5-6EV在最黑暗的区域)。 拍摄,长途的观点的一个问题是,任何不同的焦距不能补偿的“只是有点接近”所以我们不能使用这些结果作为分辨率比较没有考虑到轻微的焦距的差异。这些差异可以概括为7%的优势4×5和8×10 IQ180,缺点为玛米亚7 20%和20%索尼A900的优势。按实际价值计算,7%的优势4×5和8×10足够小,很难注意到(实际上这是小于1/10像素的优势在细节),相当于18个议员和21 mp摄像头之间的区别。玛米亚20%的缺点是相当大的,将是显著的和代表10议员和16像素的摄像头之间的区别——人支付一大笔钱! 这个测试的想法是更多关于比较结果的呈现方式,音调和颜色。IQ180的分辨率、4×5 8×10足够近焦距,比较他们的“等效”很好但是绝对分辨率的目的。 图像拍摄非常多风的条件下,大概20 - 30英里每小时偶尔强阵风。我们使用一个坚定接地三脚架和第二个三脚架8×10支持前面的元素。我们试图保护相机从风身体8×10(身体)但它正向前面的相机很容易所以很难停止。 我们所做的基本的颜色和对比度调整匹配图像尽可能(使用Portra作为基准)但我们确保我们只使用一个简单的中心颜色选择器的色彩平衡和一个简单的photoshop曲线(两个控制点)对比。我们认为,这将是比比较图像和截然不同的色彩平衡。 应该注意在所有这些测试,同时一些相机看起来特别糟糕(即玛米亚7、下岗通知和单反的)这只是因为他们被放大很多比你会在一个现实世界的情况下。这些照片在屏幕上代表看着12米8米打印(假设屏幕分辨率为100 dpi)或6米,4米的打印的情况下测试是“50%”。 目前所有的额外的测试可以在以下页面。请注意以下 完成磨相结合的智能锐化(使用反褶积削取决于半径的大小)或Photokit卷笔刀。降噪是完成Imagenomic Noiseware插件。额外的噪音被添加到一个IQ180扫描(测试)中指出使用Photoshop的“添加噪声”。 http://static.timparkin.co.uk/static/tmp/cameratest-2/800px.html http://static.timparkin.co.uk/static/tmp/cameratest-2/large.html 我们录制一些视频,但没有做好足够的工作使它成为任何令人兴奋但认为它可能增加一些背景。 我们征求一些意见讨论的结果从不同的摄影师们使用不同的平台,你可以在这里阅读的。我也写我的想法加上更多的计算结果和结论。 这篇文章是我们丰厚的圣诞特刊中,您可以访问这里。 这是1 mbps版本iPhone / iPad版本(点击这里) 错误加载播放器: 没有发现可演奏的来源 或者如果你是一个缓慢的iPhone / iPad连接你可以试着点击这里带宽较低的版本 2014-10-29 22:00 引用只看该作者不看该作者返回顶部个人图文集个人作品集 |
|
[9 楼] 晓巴
[资深泡菜]
14-10-30 20:08
跟没测一样!用同一个镜头成像在不同大小尺寸的底片上的分辨率不变,相同放大倍率下分辨率也不变。microscope 看到的4x5和8x10貌似有区别是因为显微镜的观看距离变了。这个观看距离的变化跟后期放大照片因尺寸大小不同导致清晰度不同是一回事儿。
本帖最后由 晓巴 于 2014-10-30 20:11 编辑 |
|
[8 楼] shenshenshenshen
[注销用户]
14-10-30 17:48
用户已注销,历史内容不予显示
|
|
[7 楼] 塔克的焦外
[泡菜]
14-10-30 17:25
等译文
本帖由安卓客户端发布 |
|
[6 楼] DISCOVERY66
[资深泡菜]
14-10-30 17:19
没镀膜 发表于 2014-10-30 10:26 四婶翻译完毕 |
|
[5 楼] 青梅红茶
[泡菜]
14-10-30 11:06
没镀膜 发表于 2014-10-30 10:26 一大坨啊! |
|
[4 楼] 没镀膜
[陈年泡菜]
14-10-30 10:26
庸医石头 发表于 2014-10-30 00:29 是啊,楼主好人做到底吧。 |
|
[3 楼] shenshenshenshen
[注销用户]
14-10-30 01:16
用户已注销,历史内容不予显示
|
|
[2 楼] 庸医石头
[泡菜]
14-10-30 00:29
好歹您也译成中文啊!
本帖由 Windows Phone_1.0.7.0 客户端发布 |